NGC 6188 - Fighting Dragons of Ara
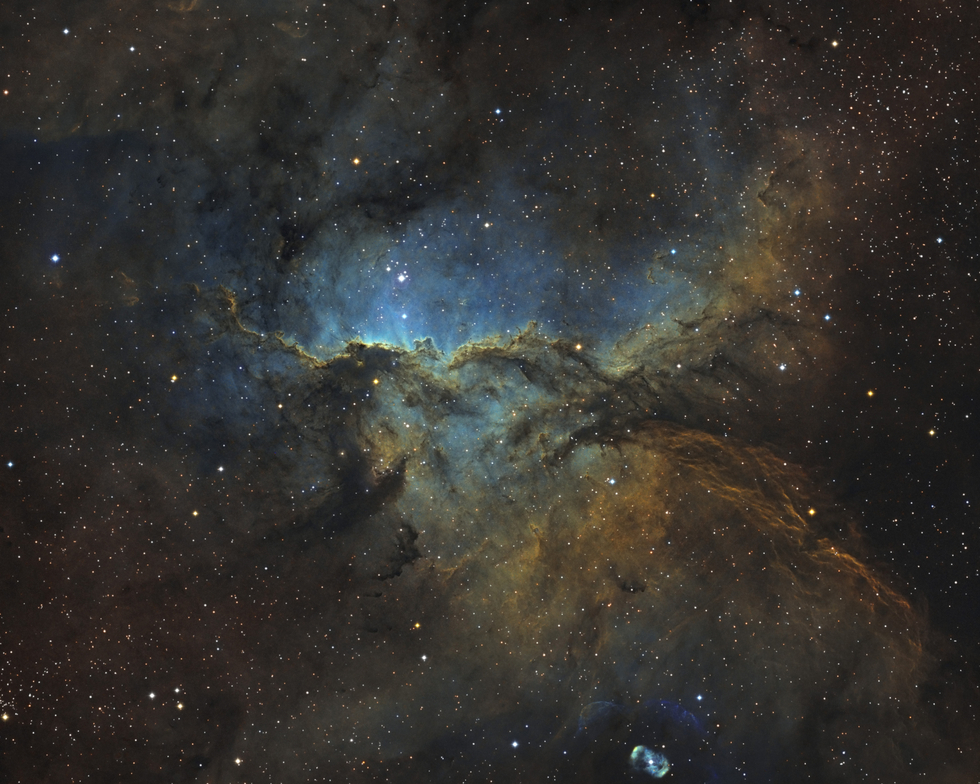
NGC 6188 - Fighting Dragons of Ara
Processing Workflow
Pixinsight
Luminance
- Dynamic PSF
- Local support - Starmask / HT
- DC w/ Regularlization
RGB Layer
- PixelMath SHO Combination
- STF Unlinked / HT
- Invert / SCNR Green 1.0 / Invert
- DC / Dynamic PSF
- LRGB Combination
RGB Starless Layer (sharp)
- Starnet
RGB Starless Layer (MMT)
- MMT (Jon Rista method w/ select wavelets) Chrominance and Luminance
Photoshop
Top Layer - RGB / Mask - Range Select + Levels
Middle Layer - RGB Starless Layer (sharp) / Mask (main object)
Lower Layer - RGB Starless (MMT)
ColorEfex - Detail Extractor / Mask (main object)
Smart Sharpen
Dodge and Sponge Tool
Clean-up with spot healer
SPECIFICATIONS
Telescope
CHI-6
Camera
FLI ML16200
Location
El Sauce Observatory, Chile
Date of observation
May 8, 2021
Filters
SHO
Processing
Listed Above
The world’s largest database of astrophotography data is waiting for you! Start now your free trial
Try it free
Comments
Very nice! curious about how you worked out the colored stars since you are using starless layers.
Using the method, STF (unlinked), HT, Invert, SCNR (green), Invert, the stars get close to natural color. To add them to the starless layer you create a layer in Photoshop with a mask for just the stars (the two layers must be quite exact - meaning no adjustments after Starnet). To create the mask I just did a range selection of the highlights until I got the right amount of stars. I then used levels to brighten them and trim the edges by pulling over the left slider until its perfect. You still need to go back and adjust the mask around the large stars.