On 18th March 2020 we've launched a one-week campaign to help you discover wide field astrophotography from the southern hemisphere and guide you through the submission workflow. With the upcoming new moon phase take the opportunity to observe with our wide field telescopes in the southern hemisphere at half price!
With 50% discount on southern hemisphere wide field telescopes for one week!
1. Choose your target
Firstly you need to select a suitable target for our southern hemisphere wide field telescopes. We have two types of telescopes, a Takahashi FSQ-106 with a large 5 degrees field of view installed in Australia (AUS-2), and two ASA 500N with a 1 degree field of view installed in Chile (CHI-2, CHI-4).
We have prepared a list of suitable targets: Wide Field Astrophotography Targets from the Southern Hemisphere (March-April)
If you're curious to know how sky coordinates work, you can watch the video tutorial "Introduction and Coordinates" from the Telescope Live Beginner Master Class by Adam Block.
2. Submit your observation
When should I submit my observations?
Deep sky imaging is primarily done around new moon or when the moon is below the horizon. This is because the bright moon badly affects astronomical images. The best time to plan and submit your observations is therefore one week before new moon. This will give you the best chances to get your images within a few days. You can obviously submit your observations earlier, or later - just consider that if you submit an observation just before full moon, you'll need to wait up to two weeks before your images can be taken.

Which telescope should I use and from which observatory?
This mainly depends on the target you've chosen but also on the weather forecasts. If you submit your observations to a telescope in Spain one week before new moon, but the weather forecasts are poor for that week, then your images will likely be obtained during the next moon phase, and there might be a delay of up to one month.
The current weather forecast at IC Astronomy indicate that our Spanish observatory will be affected by clouds for a week or so. We are therefore pushing new observations to our other two observatories in the south in Chile and Australia, where weather forecasts look good.
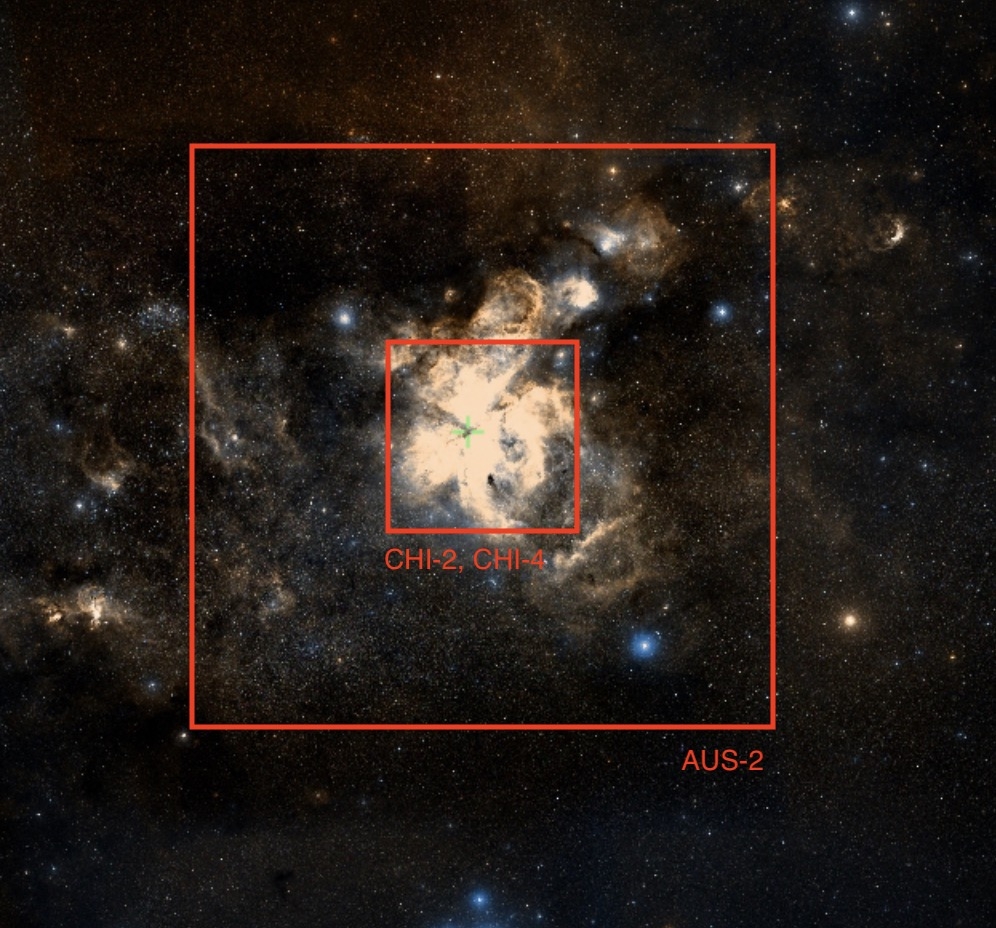
We have two choices for wide field astrophotography in the southern hemisphere: two identical ASA 500N (CHI-2, CHI-4) with a 1 degree field of view and one Takahashi FSQ-106 (AUS-2) with a 5 degrees field of view.
All these three telescopes are offered at half price, at 45 credits per hour for the Takahashi FSQ-106 (AUS-2) and at 35 credits per hour for the two ASA 500N (CHI-2, CHI-4). Note that CHI-2 and CHI-3 have a minimum total exposure time of one hour, so you will need to spend at least 35 credits if you choose these telescopes. AUS-2 on the other hand doesn't have this limitation.
The choice of which telescope to use is driven by the field of view and which portion of the nebula you'd like to capture. On our list of suggested targets, we're also specifying which telescopes you should use. If you'd like more insight into Field of Views, watch the video tutorial "Introduction to Field of Views" from the Telescope Live Beginner Master Class. In many cases, both the larger and smaller field of view telescopes are suitable, like in the example below:
3. Submit your request
To submit your request, login to Telescope Live and click on New request.
In the Target name field, insert the name of the target you've chosen, then click on SEARCH COORDINATES to get the position of the target. By doing this the object will be placed at the center of the frame. Sometimes, you might want to offset your pointing to better capture some asymmetric details. Follow the video tutorial "Introduction to Aladdin" from the Telescope Live Beginner Master Class by Adam Block to learn how.
Then you have to select the telescope you'd like to use. You should use AUS-2, CHI-2 or CHI-4, as they are the wide field southern hemisphere telescopes on offer right now, and the weather forecasts look good for both observatories. You should always check the weather forecasts for the hosting site of the telescope you've chosen to have an idea of how poor weather could affect your observation. The help pages of our three observatories have the direct link to 7-days weather forecasts, together with links to the local weather station data, sky cams and dome cams. Check the section "Weather" in our Help pages for Chile, Australia, and Spain.
In the Image Series step you can choose how many images and which filters to use. As the raw images coming from our cameras are monochromatic, you will need to acquire separate images in different filters to compose a coloured image. Moreover, you should obtain many exposures (or images) in each filter which will then be stacked together to increase the signal of the nebula and therefore the final quality of the image. For imaging nebulae, we suggest to use the Halpha, SII and OIII filters. These are so-called narrow band filters. If you'd like to know more about why these filters are recommended for observing nebulae, read this article from Atik. Use an exposure time of 300 sec or 600 sec for your images. Select at least 3 counts per filter, or more. Note that CHI-2 and CHI-4 have a minimum total exposure time of 1 hour, so, for instance, you will need to take at least 3x 600 seconds frames for each filter. Note that this number drives the total cost of your request in credits. The more exposures (counts) you take, the better your final image will be. Use the default values for the other options (binning and autofocus).
In the last step, you can choose how your observations are scheduled. For AUS-2, you should choose "Automated scheduling" and select the option "Simple moon constraints", and then set "Maximum moon illumination" to 25% and "Minimum distance from the moon" to 60 degrees. If you use CHI-2 or CHI-4, unfortunately automated scheduling is not yet available, and you'll need to manually schedule your observation. If you need help on how to use the scheduling calendar, check our help page.
4. Wait for your images...
It might take a few days for your images to be taken. In the meantime you might want to check our Blog or Facebook page. Once you submit your request, you will receive an email with an estimated completion time. This time might shift forward in case of bad weather or possible technical issues occurring on the network. You can monitor the most up to date estimated completion time by going to My Observing Request, and by opening the request details by clicking on the three dots action menu, and looking at the ESTIMATED COMPLETION at the bottom.
If you are not sure what's happening to your request, contact us at support@telescope.live and our team will be able to assist you.
5. Download your images
Once the request is completed you will receive an email notification. You will then be able to download your images on your computer. The images will be in FITS format, the standard format for astronomical images, and will be automatically calibrated.
6. Create your coloured image!
It is now time to process your images to create a coloured image.
To learn how you can follow the recent video tutorial by Peter Jenkins.
7. Post your result on our Image Gallery
Share your result with our community in the image gallery. The most popular images will be posted on our Facebook page!
8. Our staff is here to help you!
Our experienced staff is here to help you along the journey. If you have any question or doubts using Telescope Live or producing your coloured picture don't hesitate to get in touch by sending an email to support@telescope.live.