The Art of Guiding - Part I

One of the basic skills I did not fully appreciate when I first waded into the deep pool of astro imaging was guiding. The primary reason in my humble opinion that we can currently do long exposure, deep sky astro photography relatively cheaply is through the use of a guide camera and the associated software. There are mounts that are able to track targets for deep sky astro imaging without the use of a guider, but at least for me they are well out of the range of my financial resources.
Guiding is used to help correct the tracking imperfections inherent in your mount. These errors are low frequency errors in your mount’s gearing system. These are both periodic errors and random errors. You should also understand that, as hard as we try we are still not able to get the perfect polar alignment. Then there’s the problem with atmospheric refraction playing tricks by shifting your apparent position.
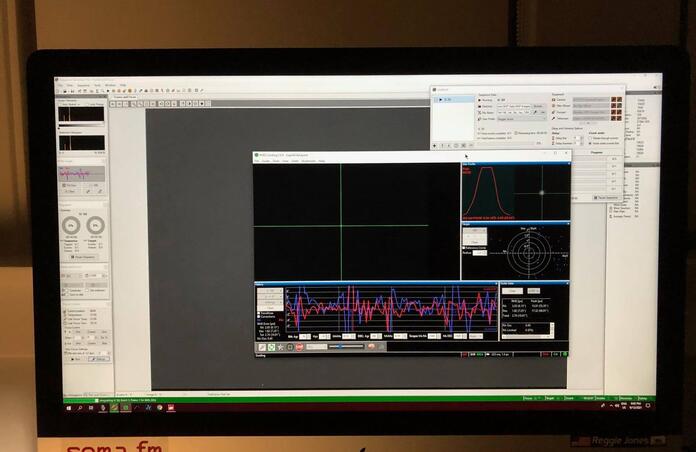
The basic idea for guiding is to have a separate imaging sensor in the field of view of the your primary camera’s imaging sensor. The separate guiding camera is used to monitor a star’s movement and give commands back to the mount to hold that star in the same fixed position on the guide camera’s imaging sensor. If the mount’s polar alignment is solid, the only movement corrections that need to be made are in the axis of right ascension, adjusting the mount’s tracking speed to stay consistent with the earth’s rotation. To prevent problems with slack in the gears or with backlash, the guiding software will usually make all the adjustments in the same direction.
PHD-2 is the standard for guiding software, created by a man named Craig Stark who open sourced the software so improvements it could be used by as many platforms as possible. It is almost laughably easy to use which is incorporated in the name itself - PHD stands for “Push Here Dummy”. There are a lot of tutorials out there explaining how to use it; the best one I’ve seen comes from Star Stuff by Dylan O’Donnell. I’ve attached the link at the bottom of this post.
When I’m doing an imaging session, I get the most stressed out over guiding; I spend most of my time keeping a close eye on it. If your guiding is off, your stars will probably not be the pinpoints of light you need to have and your target will have problems that will be difficult to fix. As easy as PHD-2 is to use there are some things to watch out for…
First, read through the manual at least once. This will save you a lot of painful lessons later.
Second, use the setup wizard to get your equipment and equipment profile properly set up.
Third, take the time to get your guide scope focused properly. If the stars aren’t focused properly, you will have problems getting a good guiding calibration and subsequently problems with guiding.
Last, do not allow the program to select the star for you; select your own star and engage the calibration routine. I’ve found that the program almost always selects a sub standard star that will be saturated. When this happens, you’ll wind up with poor guiding like I did the other night and poor quality data (image attached below).
Stay safe and get your neighbors to turn off their lights at night and convince them to join in the fun….
The astro image posted is one I took from my home in Los Angeles when the moon hadn't risen yet. Monochrome image of th Eastern Veil Nebula (NGC 6995) - Astro Tech AT102 ED with a QHY 294M with an Optolong L-Extreme light pollution filter. 12 subs at 5 minutes each.
This blog post was originally published in our Telescope Live Community.
The Community represents Telescope Live's virtual living room, where people exchange ideas and questions around astrophotography and astronomy.
Join the conversation now to find out more about astrophotography and to improve your observation and post-processing skills!
