Correcting Image Data Problems with PixInsight


Almost immediately after you’ve started your astrophotography journey, you’ll discover that Astro imaging data isn’t perfect. Many times, you’re confronted with problems contained in the data you’ve acquired that you’ll need to address to get the best image you can. In PixInsight, you’ll see these problems when you inspect your sub-exposures using the Blink process. The good news is that many of these issues can easily be corrected in PixInsight using the Cosmetic Correction process.
Satellite trails in your data are probably the most common issue you’ll see. Most of the time, minor satellite trails in your data can be taken care of using specific selections in the Image Integration process when you’re ready to integrate your data after pre-processing. However, some satellite (or aircraft) trails can be much larger and brighter than normal, as in Figure 1. The correction tools contained in the Image Integration process will not handle these kinds of issues very well. For problems like this, you will be able to use the SKill script and get very effective results (Script > Utilities > SKill ). It’s pretty simple to use, and I’ll provide more details on how to use this script in a future post.
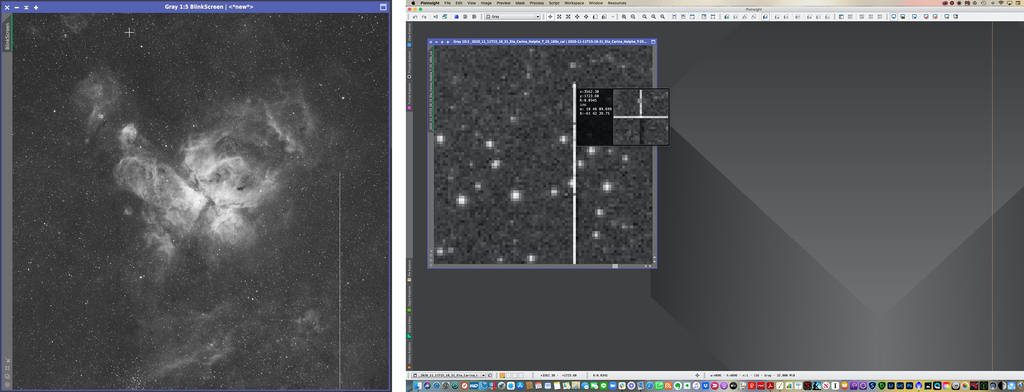
Another common issue we run into is artefacts and problems created with the imaging camera itself, such as the example seen in Figures 2 and 3, which is a problem with all the sub exposures of the 1 Click Observation data of the Eta Carina Nebula from Telescope Live. The data was taken using the Takahashi FSQ-106EDX-4 telescope and Finger Lakes Instrumentation 16803 Camera and can be found here:
I’m not sure how this problem happens, but you’ll notice a partial column of what seems like very hot pixels. The good news is that for issues like this, the Cosmetic Correction process in PixInsight will easily solve this kind of problem.
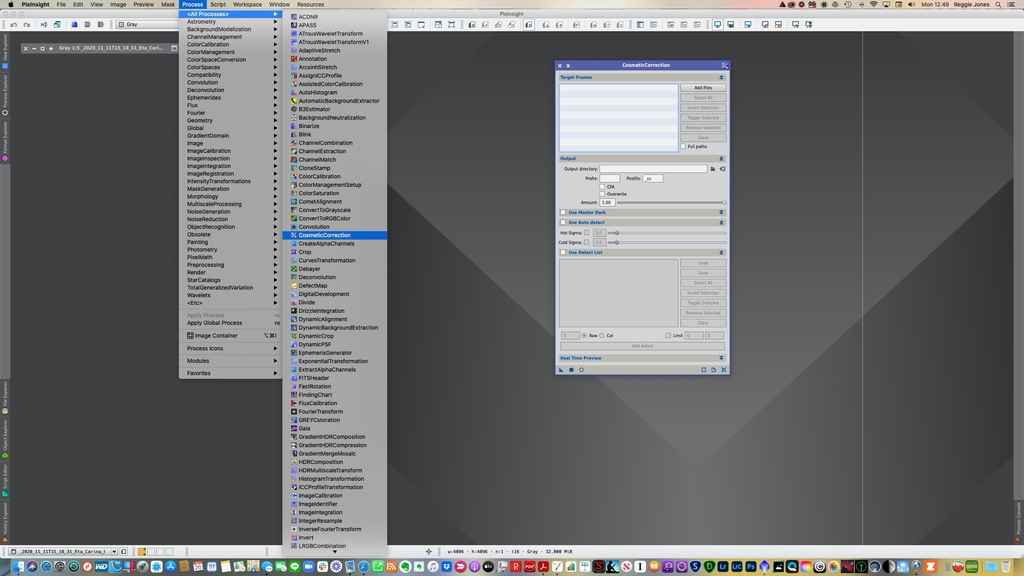
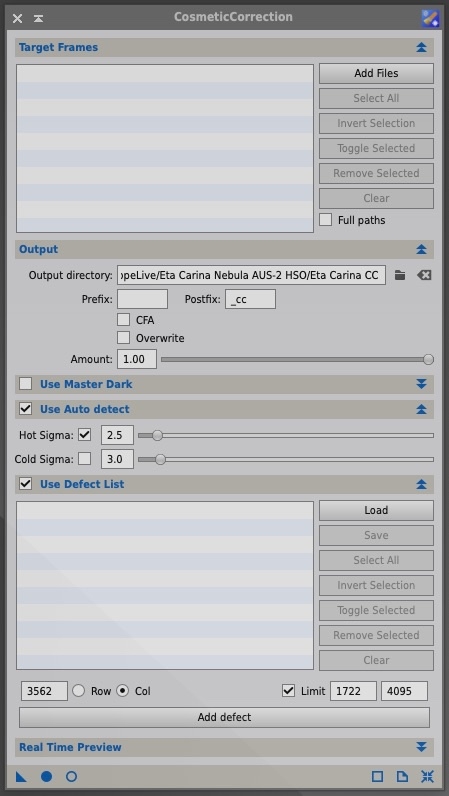
After you’ve calibrated your images, open the Cosmetic Correction process (All Processes > Cosmetic Correction) shown in Figure 4. There are 4 sections in this process that you will need to populate with information to process your image. Looking at Figure 5 -
- Target Frames - This is where you load in all the sub exposures you want to process the corrections on; simply use the “Add Files” button to add the files which will show in the window to the left of the “Add Files” button.
- Output - This is where you tell the process to send the completed processed files. Use the folder icon to the right of the “Output directory” window to locate the folder you want to send the processed output.
- Use Auto detect - Here, you’ll provide how aggressive you want to process out hot and cold pixels. I use around 2.2 to 2.5 sigma for hot pixels and leave Cold Sigma at 0 for cold pixels.
- Defect list - This is where we identify and make corrections to rid ourselves of the artifacts. To do this, you need to identify the location of the problem pixels that need to be corrected. Use one of the sub exposures and zoom in on the problem area and right click on the top pixel of the affected column (Figure 3). You’ll get the X,Y coordinates of that pixel. X,Y will translate to Column, Row in the process - in this case, the affected column is X=3962 and the affected row is Y=1723. Because the artifact does not affect the entire column, you will check “Limit” and in the first box enter 1723 (I entered 1722 because I also wanted to include that pixel as well) and in the second box enter 4095 since that is the last pixel in that row for that column. When you have all that entered, use the “Add defect” button and add that defect to the defect list. If you have any additional artifacts you need to address, just repeat this process until you have all of them entered into the list.
With all this done, simply press the Apply Global button on the bottom left and the processing begins. When the processing is complete, go into the output directory you selected for the processed sub exposures and review them using Blink Process to make sure all the corrections were made as planned. If they were and look good, then proceed on to the next steps in your workflow.
Finished Image Info
IC 2944 Narrowband Pro Dataset
Telescope = CHI-6; Officina Stellare RH200
Camera = FLI PL 16200
July 2021; Processed in PixInsight
Dataset is found here.
This blog post was originally published in our Telescope Live Community.
The Community represents Telescope Live's virtual living room, where people exchange ideas and questions around astrophotography and astronomy.
Join the conversation now to find out more about astrophotography and to improve your observation and post-processing skills!