HDR function in Photoshop


Well, maybe not so happy for us here in the United States and wherever else does DST tonight. Spring Forward cuts into imaging time! But enough of that because instead, I am going to talk about a thing I used in landscape photography all the time but hadn't been using it in DSO imaging. Combining images using the HDR function in Photoshop.
The California Nebula bundles for the March contest definitely gave me a bit of a time on some of it. When I would bring out all the faint stuff around it I would blow out the highlights. When I tamed the highlights I would miss all the fainter gasses. It was a little annoying to me, so I decided to try using the HDR Pro function in Photoshop since it worked well for bringing up shadows and keeping highlights from clipping for landscape stuff, why not try it with this object.
So, what I did was first go through the images and pull out anything I thought was iffy (and put it in a folder called "iffy") then I loaded everything into APP. I did the normal stack, combine RGB, mess with percentages to get the balance I wanted, batch crop, selective color, etc. and then I saved it as 7 different auto stretched levels as a 16 bit tif file I also saved the unstretched 32 bit floats fit file so I could mess with it in PI if I wanted to later on.
In APP over on the right side you have a menu that allows you to go from no stretch all the way up to a 30% bg, 2 sigma, 0.0% base stretch. I actually use that stretch a lot to get the best results on the light pollution removal tool.
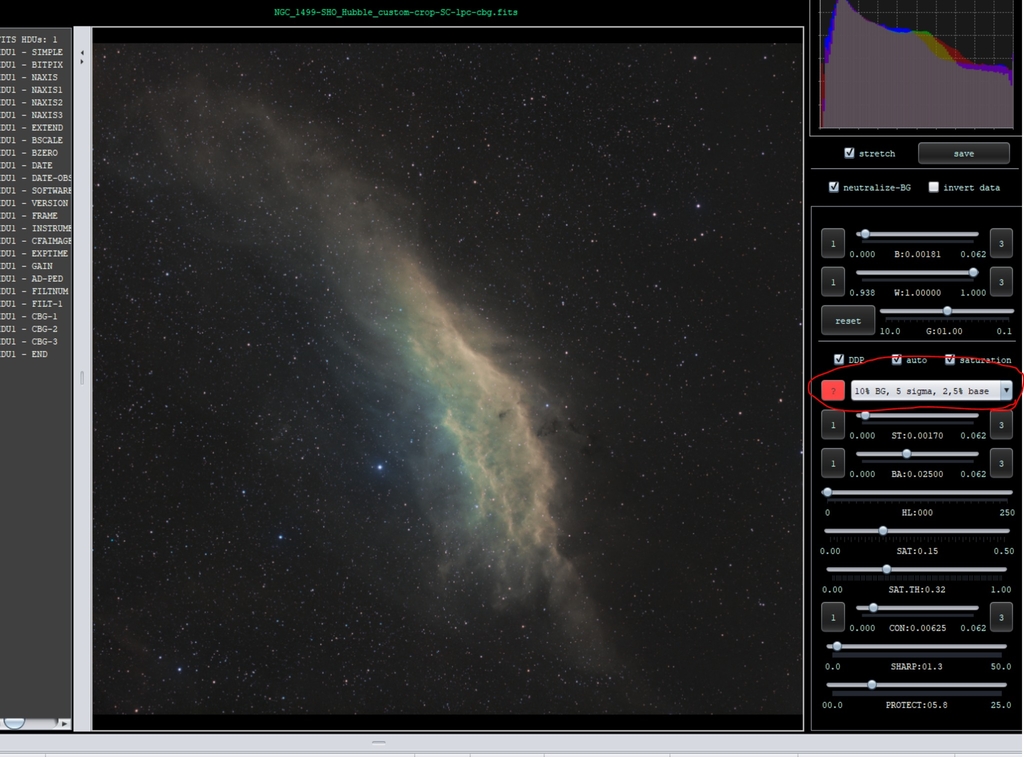
You can see the difference between the lightest stretch and the heaviest stretch, and it is pretty substantial. If you do no stretch it looks black of course, meaning that the data did not have anything clipped from stacking and is very good data. If there had been anything that was clipped and not recoverable in post it would actually show up as completely white on the non-stretched image.
I have highlighted the stretch amounts I used for my HDR merge. As you can see it is at the bottom and the top of each percentage set and the 30% one as well. I figured that would give me a good base to start with.
Now when you do this make sure you have already done the batch crop tool because you can't merge different size images. I saved all of my images in one folder to make things easier.
Next I went to Photoshop and used File > Automate > Merge to HDR Pro and then selected my files for the HDR merge. You can see how I named them sequentially to keep things straight. You want to do this because in the next step it will ask you to select values for each exposure and you're going to want to give the it made up values that start from lightest to darkest. Keep your ISO set at 100, f stop at f/4.0, and then only adjust shutter speeds. I used from 1/250 to 1/4. Now this will not even come close to translating to what these exposures are or how far apart these exposures are, but we aren't going for accuracy here at all. We just need a different value for weighting.
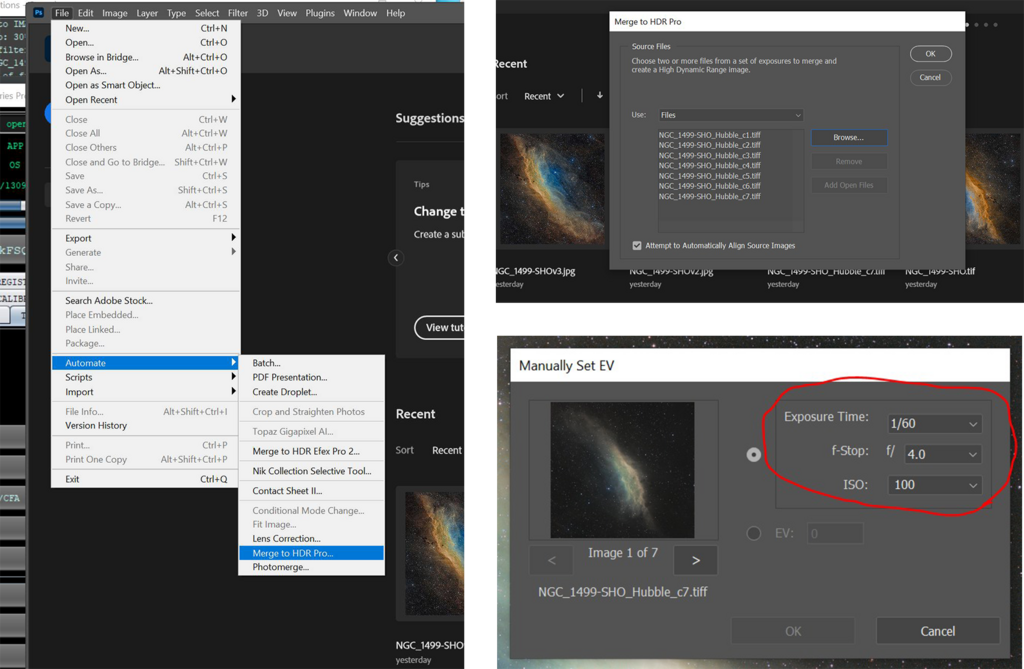
After you do this and let it continue on you're goign to get an HDR image that is basically a preview and some sliders to mess with. I went ahead and pulled the highlights down by 50%, shadows down by 15%, and had both vibrance and saturation at 20%. Of course you will want to mess with it and get it to your liking. Hit OK and then you have your 16 bit tif to work over in Photoshop!
I have went ahead and put my finished result in, flipped and cropped along with some color correction and noise reduction. All in all this is a pretty handy technique and one I will continue to use in the future.