PixInsight Blur Xterminator Process


Blur Xterminator is an advanced deconvolution process developed by Russ Croman, who also developed the Star Xterminator and Noise Xterminator processes. He used a technique called neural networks or AI to develop these tools. To understand what this tool is and how it works, you should take the time to watch the lecture Russ gave at the last Advanced Imaging Conference. I would also recommend watching a very interesting interview that Adam Block did with Russ Croman where Mr Croman further explains how these networks work and their application.
Blur Xterminator was specifically developed for use on astro images taken using amateur equipment. Deconvolution algorithms, such as the with PixInsight use an image’s point spread function (PSF) to make approximations of what the correct sharper image should look like. For PixInsight specifically, you obtain the best PSF approximation information using the Dynamic PSF process or the PSF Image Script. Applying neural network techniques allows a process like Blur Xterminator to be trained on what real, high resolution images actually look like and use this information to recover as much of the detail that is actually present in low contrast astro images. It does not need to make approximations or guesses as to how an image should be de-convolved.
This process should be used in the linear stage of post processing; immediately after integration, channel combination and color calibration and background flattening and before any further processing from this point. To open this process, go to Process -> All Processes -> Blur Xterminator.
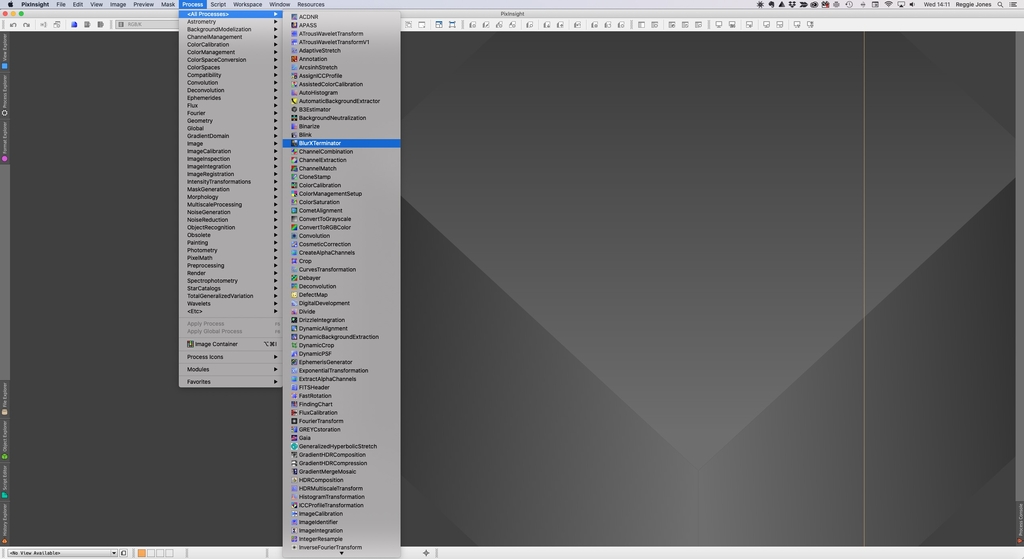
You’ll then be confronted with 3 sections in this process.
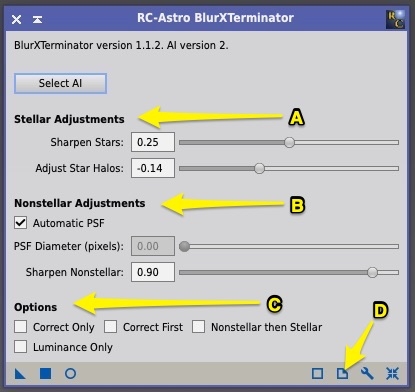
(A) Stellar Adjustments - here there are 2 adjustment items, Sharpen Stars and Adjust Star Halos. The Sharpen Stars adjustment allows you to reduce the diameter of the stars (Full Width Half Maximum or FWHM). High numbers will bring smaller and sharper stars. Be careful raising this to a value of 1 as this is the setting to use to get perfect pinpoint stars. This probably won’t work on many images without creating artifacts. I find that a setting on 0.25 seems to generally work well. The Adjust Star Halos adjustment will adjust star halos. High values will give you bright, softer halos and low values will provide a sharp appearance with a harder edge to the halo.
(B) Non stellar Adjustments - there are 3 adjustment items, Automatic PSF and PSF Diameter and Sharpen Non stellar. The Automatic PSF adjustment if checked will determine the non stellar PSF automatically to sharpen non stellar items in the image. You need to be sure there are stars throughout the image for this to work properly. This is the setting I use most often. If you do not check the Automatic PSF adjustment, the PSF Diameter adjustment will become active and is used to deconvolve non stellar features in an image manually. For this work well, you’ll need to manually determine the PSF for the image either by using the Dynamic PSF process or using the PSFImage script. The Sharpen Non stellar adjustment adjustment is the amount to sharpen non stellar features.
(C) Options - There are 4 selections here. Correct Only allows for corrections for optical errors such as from guiding, coma and chromatic aberration among others. Correct First will process the image twice; first will be with the same processing as the Correct Only option did second with all the other options enabled. Non stellar then stellar does non stellar sharpening first and then stellar sharpening. Luminance Only will apply deconvolution only to the luminance channel of the image.
Much of this information and more can be found in the documentation for this process in PixInsight. Simply click on the documentation icon for the process (D) and read it in the program or download it as a PDF file to read later. I would encourage you to do this and get a better understanding of this amazing process.
Clear skies….
Astro Image Credits:
NGC 1313 - Telescope Live 1-Click Observation Data, Processed using PixInsight by Reggie Jones