PixInsight Image Annotation


PixInsight has a process script called Image Annotation, where all the known objects contained in your image can be identified and labeled. This includes deep sky objects, stars and if you’re really lucky comets and asteroids. It’s pretty simple to do but you need to do it at the end of your workflow when you have the final non linear image that you want to display.
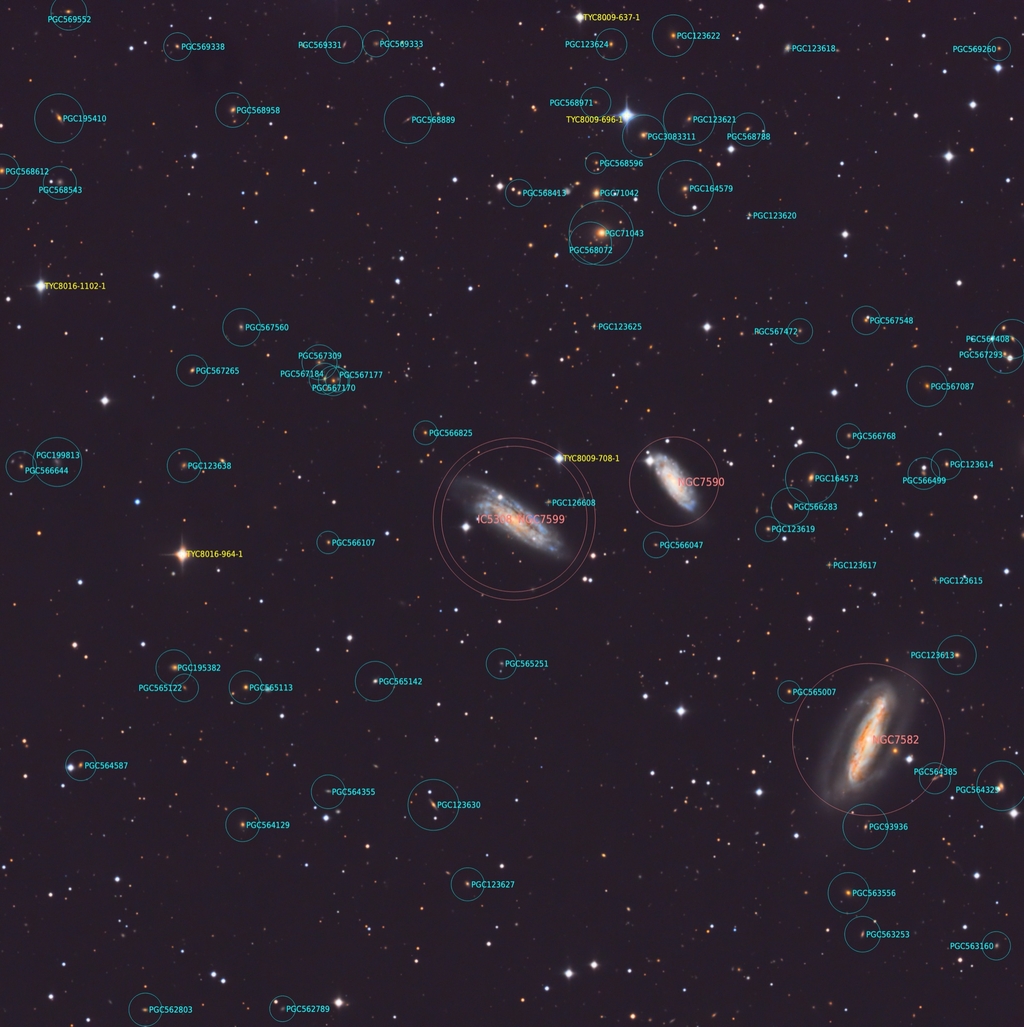
The astro image I’ve attached of the main galaxy NGC 7599 with galaxies NGC 7590 and NGC 7582 in the constellation Grus, the Crane. This was taken on CHI-1 and the result of broadband 1-Click Observation Data of 12 x 600 second exposures each in Luminance, Red, Green and Blue and processed this using PixInsight. The accompanying image is the annotated version of this astro image.
In order to create an annotated image in PixInsight, your primary image must be plate solved. If you’re working on the workflow for a broadband RGB image, this is usually done if you use the Photometric Color Calibration (PCC) Process. However, if you did not use PCC you’ll need to do this separately using the Image Solver Script (Script > Image Analysis > ImageSolver) shown in Figure 1. There are 5 sections in this process.
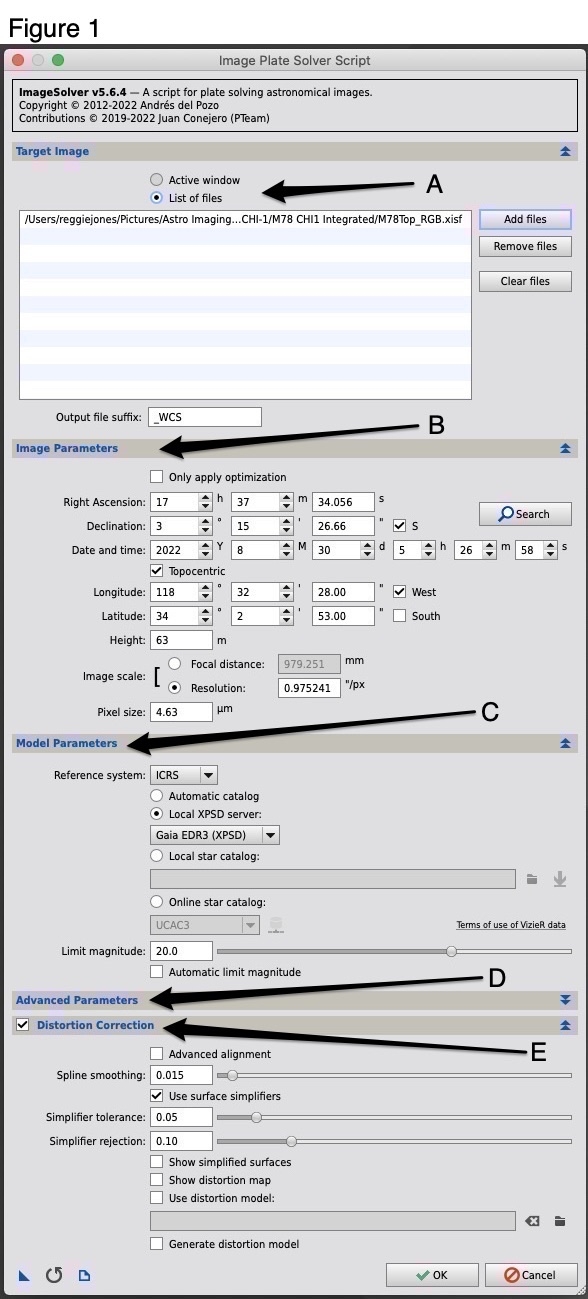
Target Image section - make sure the image you need to plate solve is the active window. After it opens, you’ll see the file listed in the file window ( A ) under the Target Image section. if it isn’t there, you can add it in the window using the “Add files” button.
Image Parameters section ( B ) - here the celestial coordinates should be shown that comes from the FITS file data. If you doubt if the info here is correct or this data is missing in the FITS file, use the search button on the right to do a search of the main object in your window and you can have the info added from there. You should also check and make sure the Image scale info (telescope focal length and camera pixel size) is correct.
Modal Parameters section ( C ) - this is where you identify the catalog files that will be used to plate solve the image.
Advanced Parameters section ( D ) - I leave this as it is; I’ve never had to do anything with this section.
Distortion Correction section ( E ) - this allows you to correct for atmospheric problems; I check the open box for this section and just use the default settings.
After you’ve completed this and checked everything, hit the OK button and let it solve. You’ve now plate solved your image.
Now you’re ready to open the Annotate Image script shown in Figure 2 ( Script > Render > AnnotateImage ) and get down to business. There are 4 sections in this script.

Layers section ( A ) - in this section, you identify what types of objects and catalogs you want annotated as well as whether or not you want to apply a celestial grid. Use the green “ + ” icon to view and add the catalogs you may want. The red “ - “ icon is used to remove any catalogs you do not want. You need to check the box to the right of the catalog selection to make it active.
Grid Parameters section ( B ) - here you identify the colors for the annotation markers and labels to be used for each catalog selection. Simply highlight the catalog selection in the Layers section and then select the specific color to use for the markers and labels.
General Properties section ( C ) - This is the section that does the actual work of annotation. The Output Mode should be set to “Annotate image”. Since you’re applying this to your final image, the “Apply STF before annotation” box should NOT be checked since your image should be non-linear and already stretched. The “VizieR server” selection is similar to the one in PCC. This is where you select the server closest to you to use. As I am in the U.S., I always select “CFA Harvard”. You’ll also want to check the “Remove duplicate objects” and the “Optimize label placement” boxes. I do not check the other selections. The “Text scale” and “Graphics scale” can be used to make adjustments of the labeling when doing a preview of your annotated image.
Observation section ( D ) - I just leave the defaults as shown here.
After all this is completed and checked, click on the Preview button on the bottom left of the window. You’ll be presented with a preview of your annotated image. If it all looks good, hit the OK button and get your image. You’re now done. If not, make adjustments to the catalogs, marker or label colors, the text or graphics scale and preview again until you get something you like.
Have fun!
This blog post was originally published in our Telescope Live Community.
The Community represents Telescope Live's virtual living room, where people exchange ideas and questions around astrophotography and astronomy.
Join the conversation now to find out more about astrophotography and to improve your observation and post-processing skills!