Resampling Your Data with PixInsight
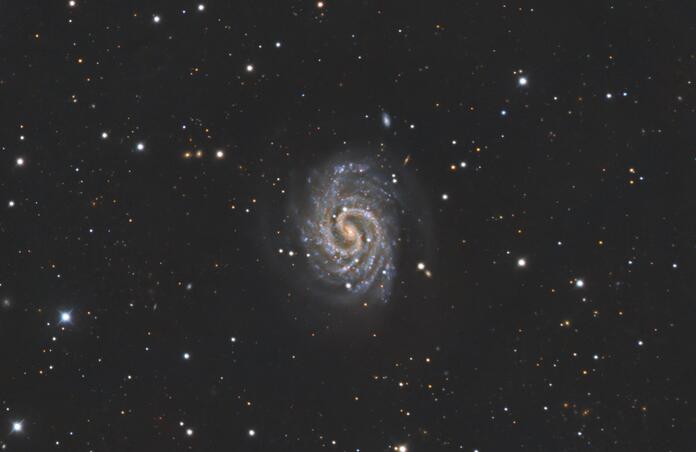
When you combine different datasets of the same target there are some issues you’ll need to address almost immediately to be successful. Such is the case with 1-Click Observation data for my attached image of the galaxy NGC 4535. There were a couple of different sets of data involved in processing this image - one set had binning of 1x1 and the other set was binned at 2x2. You’ll want to combine all of this data to build into a nice image; to do this, one set or the other will need to be resampled and PixInsight offers an effective process to do just that.
The Integer Resample Process
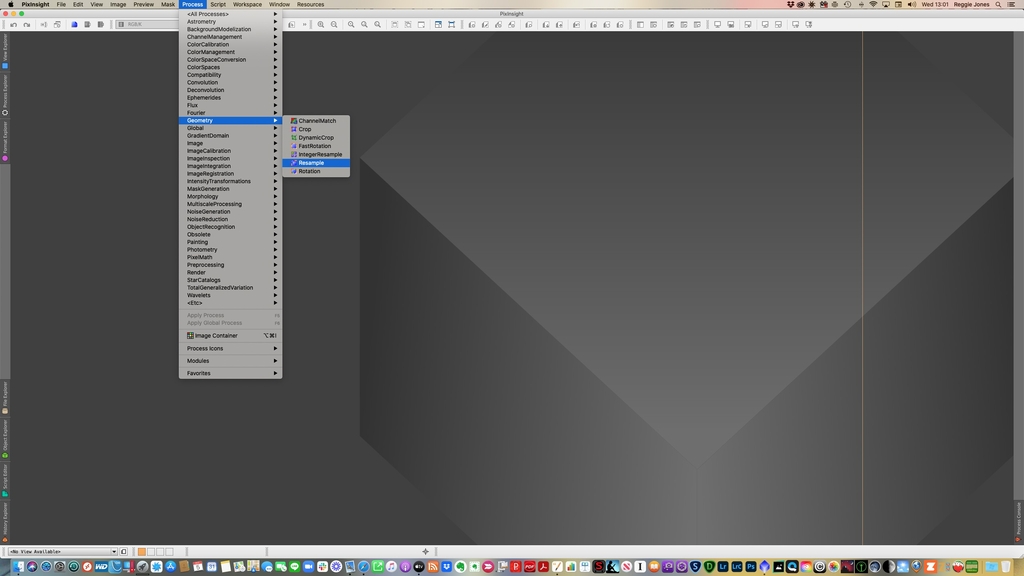
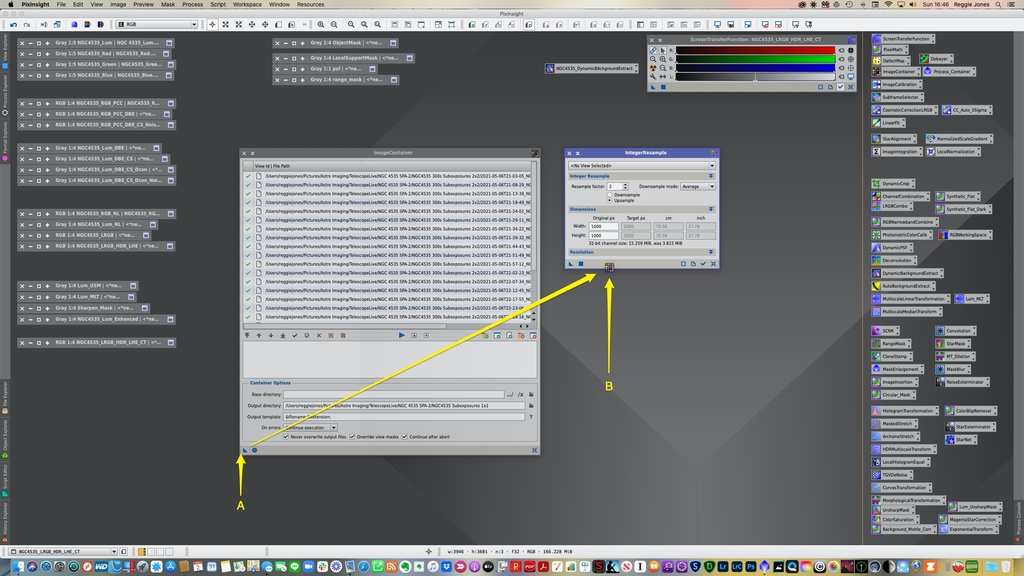
The PixInsight tool you’ll need to use is the Integer Resample process. In this case, I resampled the 2x2 binning data to 1x1 binning, which means that I upsampled these files. Figure 1A shows how to get to this process ( Process > Geometry > Integer Resample ).
Once you’ve opened it, you see the dialog window in Figure 1B.
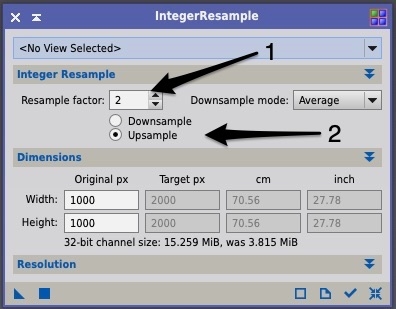
The process is normally designed to apply to a single file and you would need to select the view / file selection to apply this to. However, we’ll need to apply this process to several files, so we are going to ignore this selection and set things up to apply to the set of files that we need to. There are 2 other selections that we need to make:
Selection 1 - Resample factor: This is the scaling factor that you want to use. In this case, we want to use a scaling factor of 2.
Selection 2 - Upsample / Downsample: Since we want to go from 2x2 binning to 1x1 binning, we want to select “Upsample”. If we wanted to go from 1x1 binning to 2x2 binning, then we’d need to select “Downsample”.
Note: If we wanted to downsample, we’d also need to select the Downsample mode we want to use. This is the resampling algorithm that will be used, and it will either be average, median, minimum or maximum.
The Dimensions section comes into play if we were to specifically select an image / view in the selection at the top. The original pixel values will show in the corresponding windows for width and height and the rest of the values will show what the target values for the final image size will be based on the original values of the image, the resample factor and if we’re going to upsample or downsample.
All that said, we don’t have just 1 file to resample; we have several. In the case of this data, I need to resample 20+ files. Resampling each file one at a time would be very tedious so we’re going to use another tool in PixInsight to handle all the work - this is the Image Container process shown in Figure 2 below.
The Image Container Process
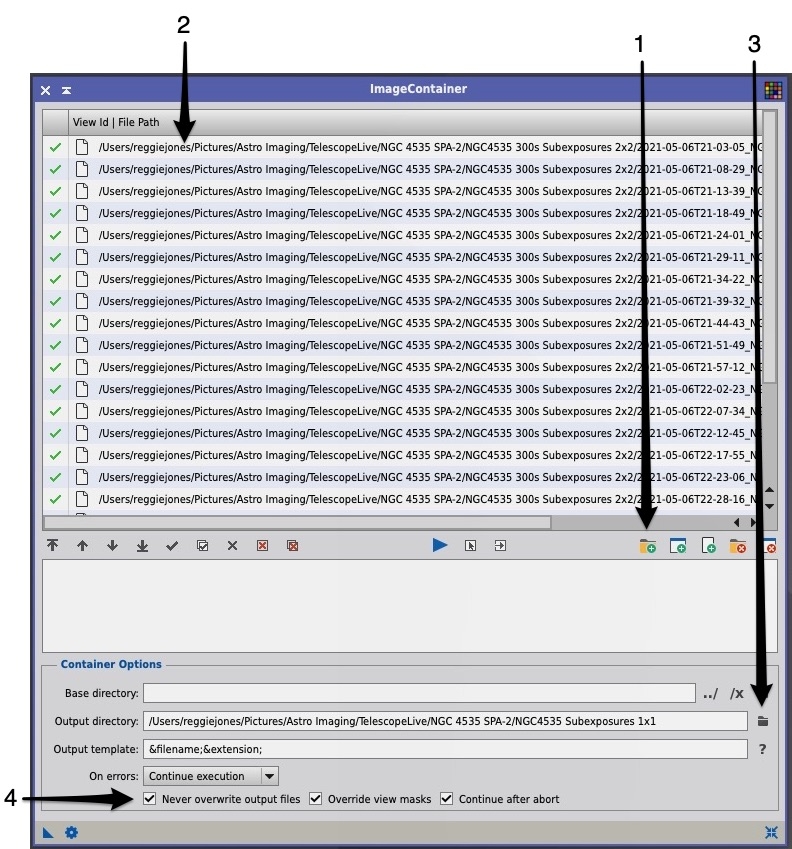
This process allows you to apply multiple files at a time to a PixInsight process. As with the Blink process, click the folder with the green “+” ( 1 ) to load all the files you need to apply a process to. These files will show up in the file list window ( 2 ). Next, you’ll need to identify the output folder you want to send the processed files to by clicking on the Output file selection folder ( 3 ). Be aware of the selections at the bottom of the dialog window ( 4 ). If you don’t want to Overwrite the output files, you’ll need to select this option. Generally, I usually ignore the remaining selections here as they don’t normally apply.
Applying the Integer Resample Process
Now you’re ready to apply the Integer Resample process to your files - this is shown in Figure 3. As with other PixInsight processes, click and hold the blue triangle at the bottom left corner of the Image Containerprocess ( A ) and take it and drop this triangle in the lower band of the Integer Resample process ( B ). When you do this, the process engages and you can watch it run.
When it completes, you can use the Blink process to open the completed files and inspect to your satisfaction that the changes were made per your request.
If so, then it’s on to the next step in your processing workflow.
Image Credits
Posted Image - NGC 4535 Combined Advanced Request & 1-Click Observation Data
Telescope = SPA-2; Officina Stellare 700RC
Camera = FLI PL 16803
Data Dates = March 2021 & May 2021
Processed in PixInsight
This blog post was originally published in our Telescope Live Community.
The Community represents Telescope Live's virtual living room, where people exchange ideas and questions around astrophotography and astronomy.
Join the conversation now to find out more about astrophotography and to improve your observation and post-processing skills!
